

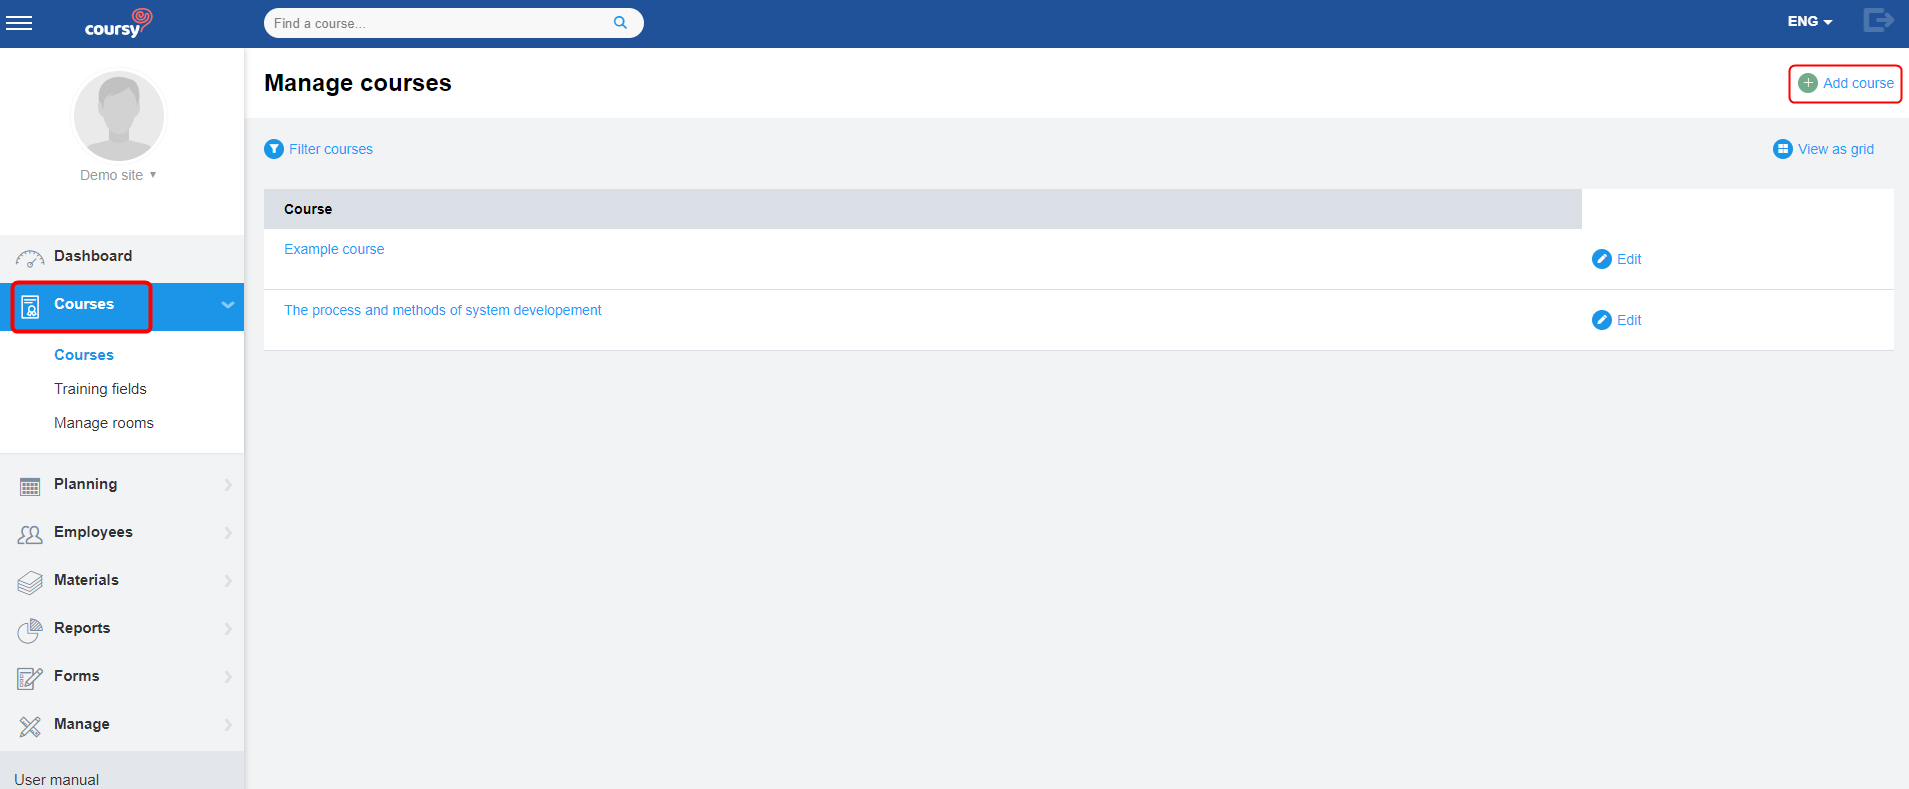
To start adding a new course, open the Courses menu item and click Add course. Creating a course consists of three steps:
- General data for entering course name, picture, description etc.
- Targets where you define the target groups of the employees the course is meant for.
- Initial version for adding trainings with study materials or other content for the course.
Use the site’s default language when entering the initial data for the course. Translations can be managed later from the Course detail view.
General data
You can define the following information in the General data step:
- Course access
- Course name
- Fields – Course training fields are visible to the participants in theCourse overview (General Information section) of the Employee Portal
- Featured image – visible to the participants of the course in the Landing page of the Employee Portal. The image must be at least 730 pixels wide
- Description – visible to the participants in the Course overview of the Employee Portal
- Planning recommendation – this field is meant for the TMS users and is visible in the occurrence’s Schedule view (not visible in the Employee Portal)
- Expires – here, you’ll define whether the course is meant to be taken repeatedly (for ex. in every 3 years) or only once. The system creates a training need deadline for the employees who take a course that needs to be repeated. The deadline for retaking the course is calculated based on the date of the previous passing. For example, if the course expires in 1 year and the employee passed it on 10.10.2018, then the system sets their training need deadline as 10.10.2019
- Issues a certificate – By checking this checkbox, you give the employee and TMS user the chance to download a certificate after successfully completing the course. The employee can download it from the Employee Portal Landing page (the course can be found from the Completed courses section). The TMS user can download the certificate from the Employee profile view Course history section
- You can choose whether the certificate numbering is company-based or course-based. If the numbering is company-based, then the system will generate unique numbers for the certificates even if they are issued for different courses. If the numbering is course-based, then the certificate numbering starts with 1 for a new course.

After filling out the fields, click Next to continue to the Targets step.
Targets
Defining course targets allows you to set which group(s) of employees the course is meant for. This group of employees consists of those assigned a specific Department, Role, and Level (DRL).
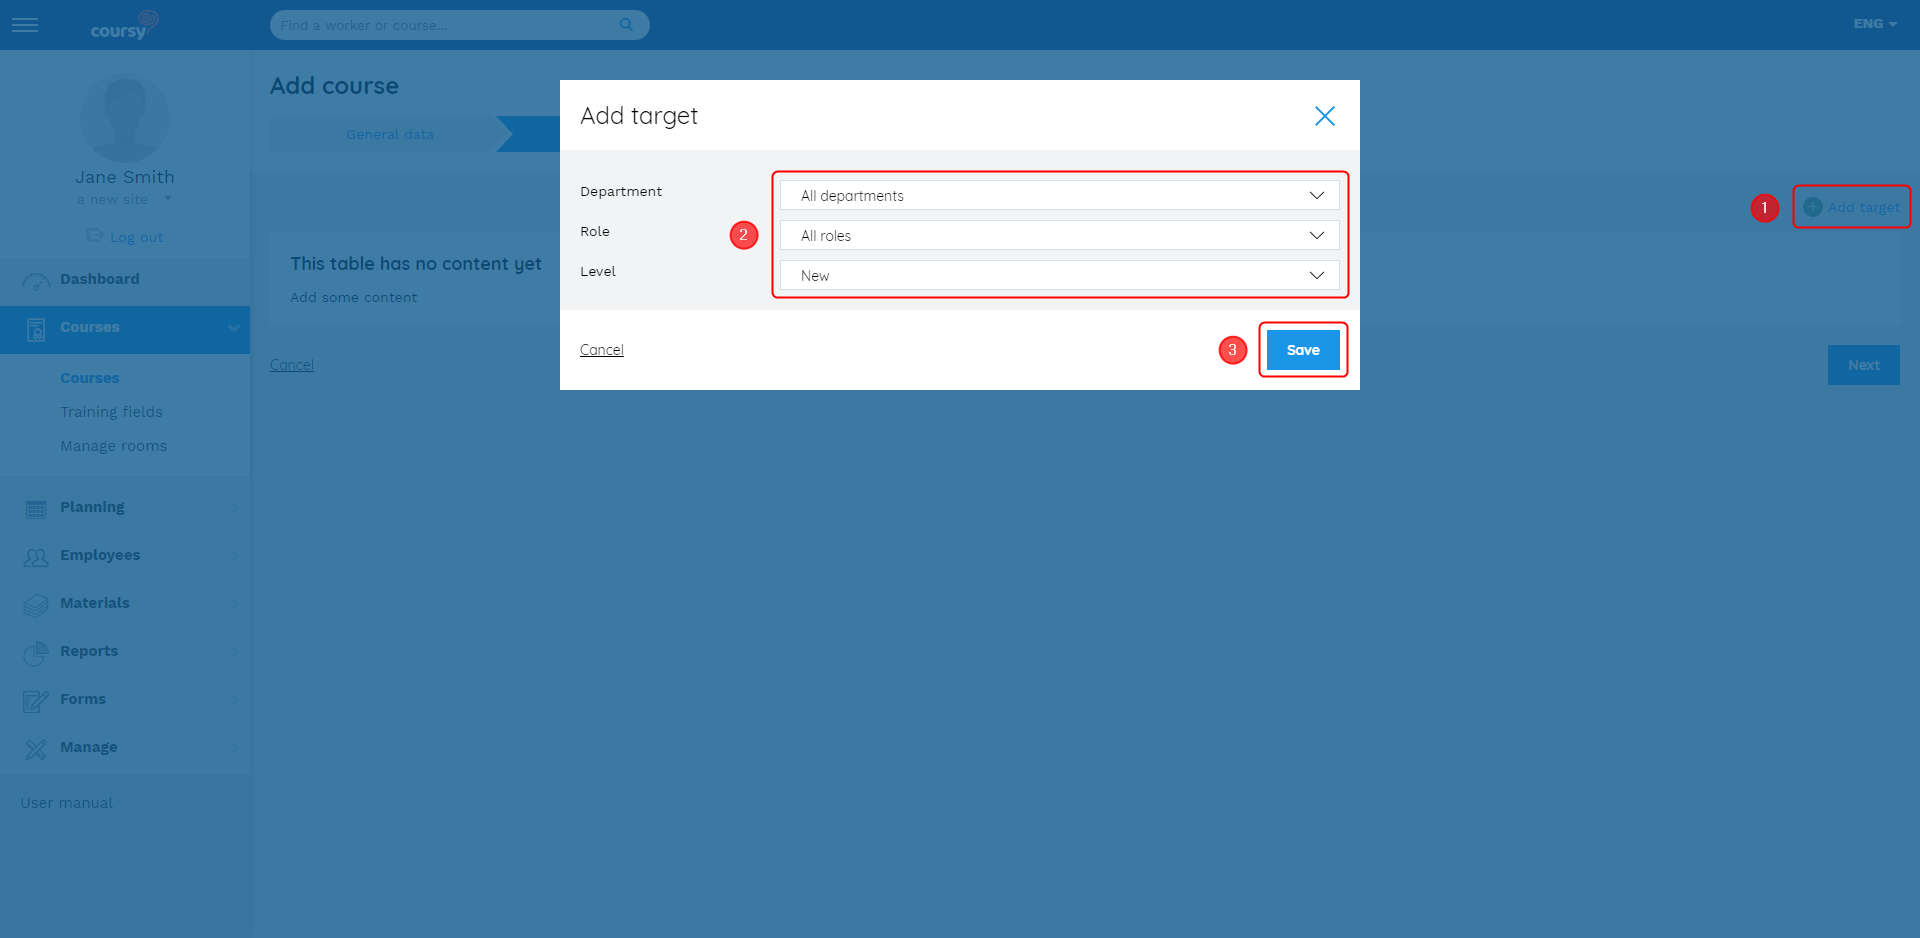
Targets can be very specific, but they can also be more general. For example, if you wish the course to target all new employees regardless of their department or role, set the target as “All departments”, “All roles”, “New”.
It’s possible to add multiple DRL sets as targets. You can also edit or remove targets. Adding targets is not mandatory, but it’s useful because it eases the process of adding employees to occurrences. Employees based on targets are also displayed in the Training needs view and Courses and targeted employees report.
Adding a target
- Click Add target
- Choose the department, role, and level (check the corresponding checkboxes)
- Click Save
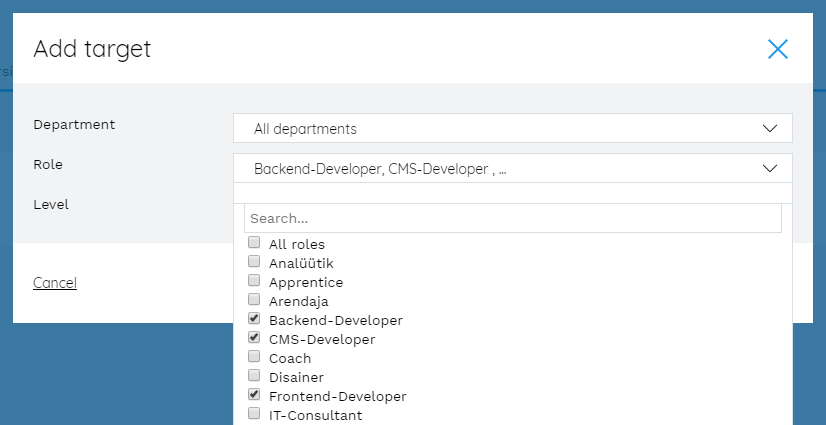
Adding multiple targets in one go
To bulk add targets, you can check multiple checkboxes of the department, role, or level. If you have selected multiple values on one of the DRL fields, then you can only select one value on the other two fields.
The system creates a separate entry for every added target combination. This makes it possible to edit or remove individual targets at a later time.
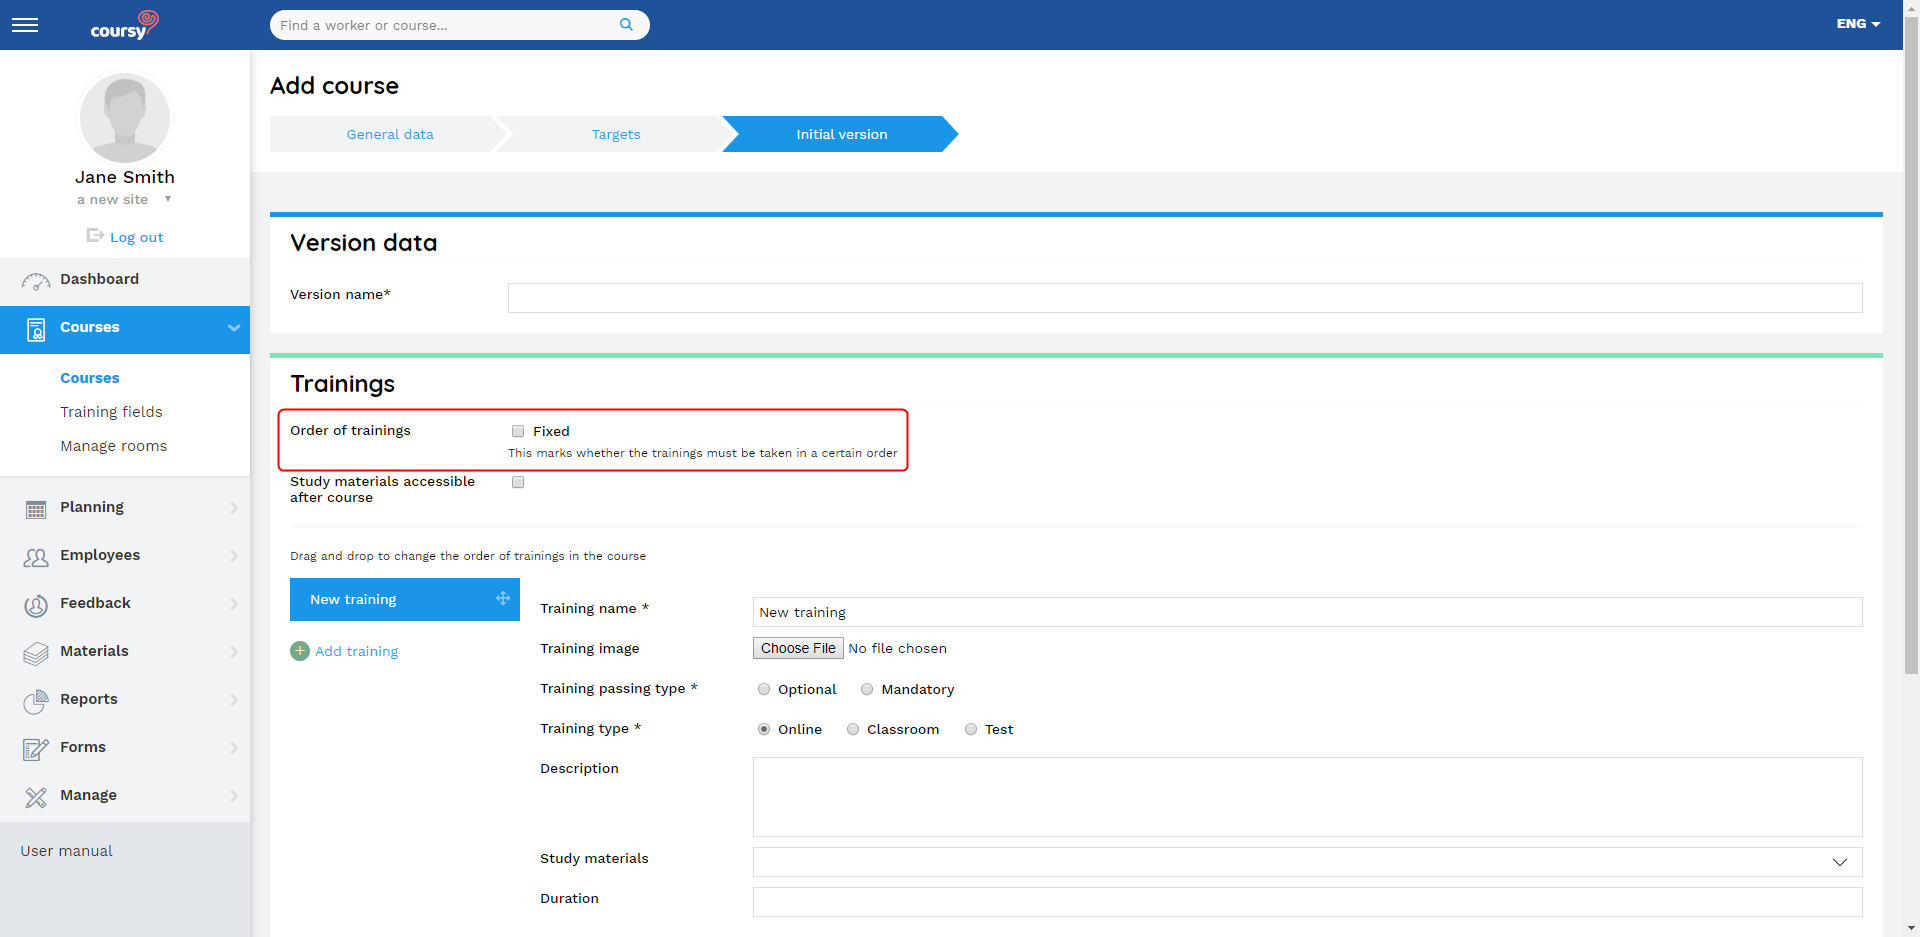
Initial version
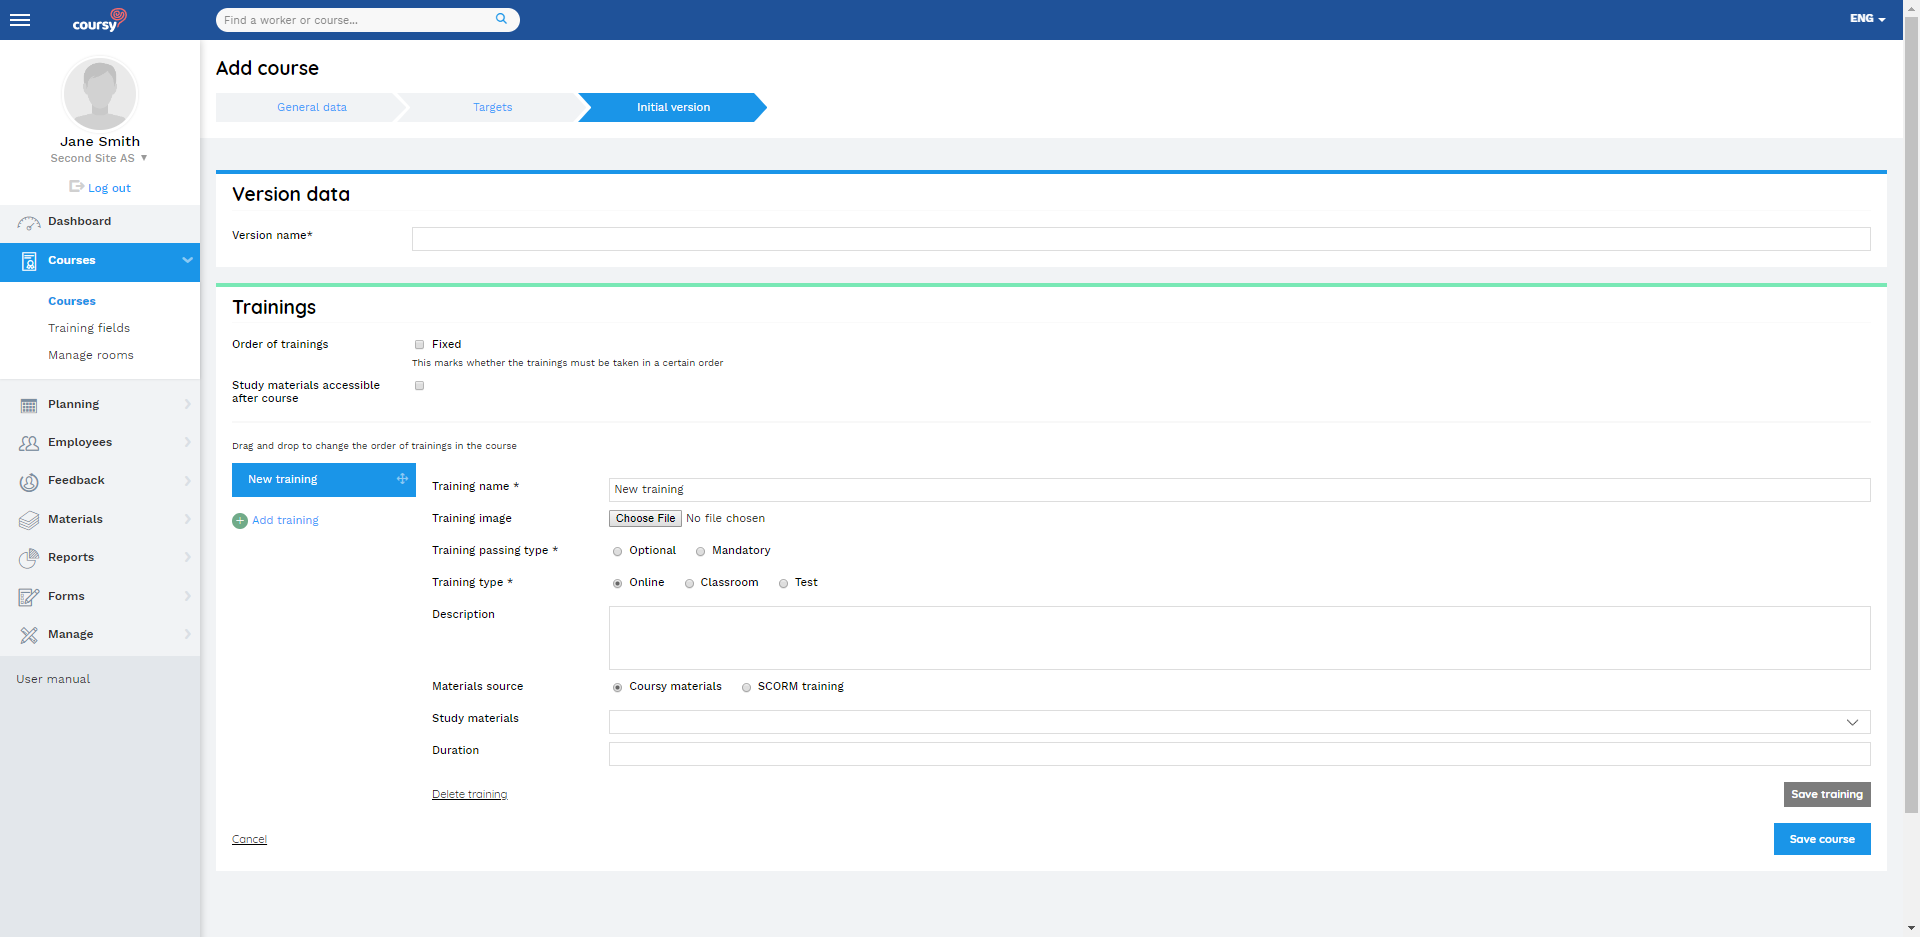
Creating the initial version
- Give a name to the version.
- Set whether the order of trainings is free or fixed.
- Set whether the study materials are accessible after (successfully) completing the course or not.
- Add the trainings.
- Click Save (this is the last step of creating the course).
Trainings
A course is built up of trainings. The employee needs to pass all the mandatory trainings in the course to successfully complete the course.
There are various types of trainings:
Online trainings
An online training is passed when the participant completes the training’s study material in the Employee Portal. Online trainings can be mandatory or optional. Optional trainings don’t affect course progress.
Information about how online trainings are displayed in the Employee Portal can be found here.
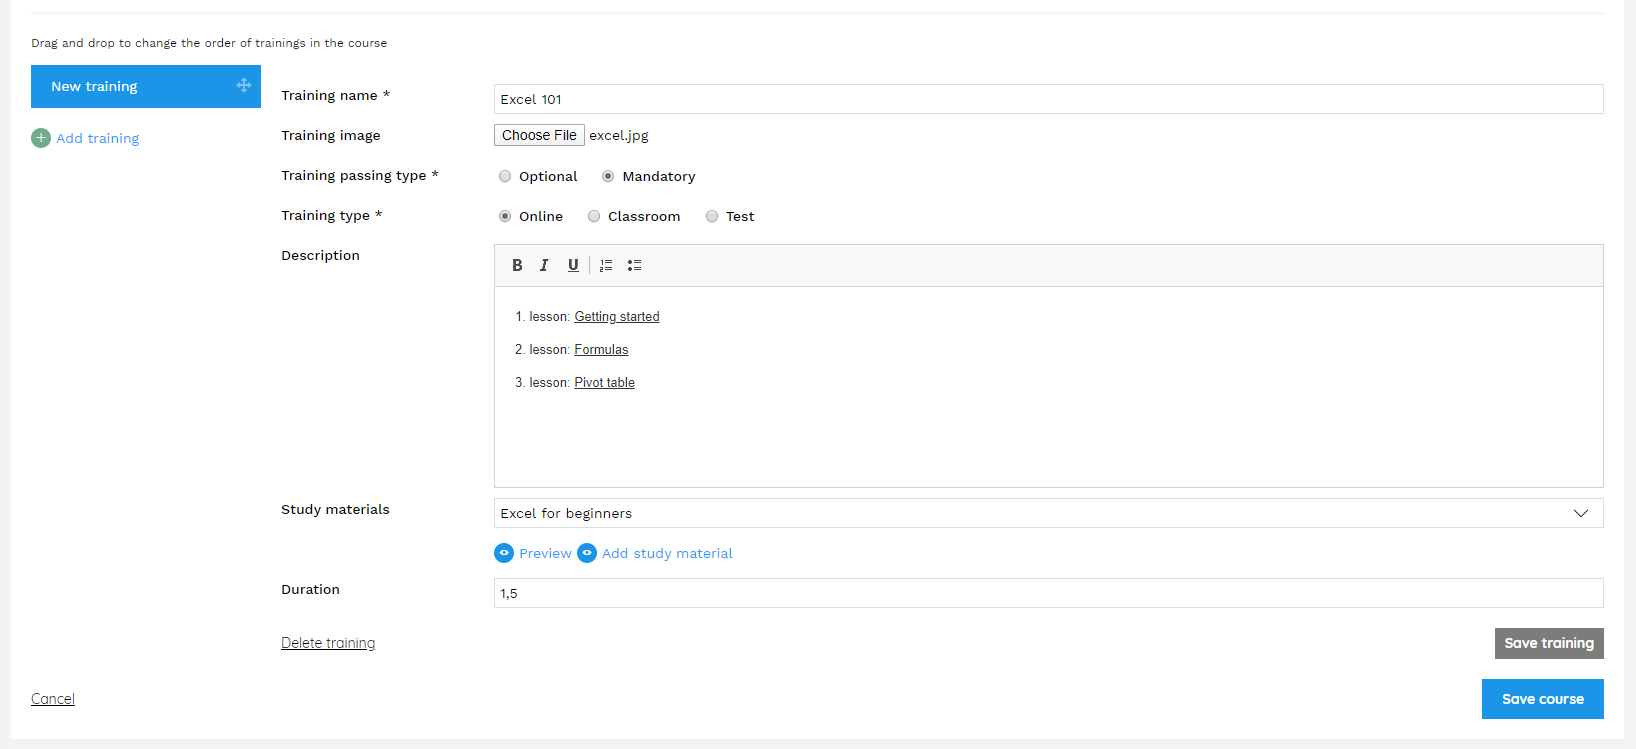
Adding an online training
- Enter the training’s name
- (Optional) add a picture to the training
- Choose whether the training is mandatory or optional
- Choose Online as the training type
- (Optional) write the training’s description
- Attach a study material to the training
- You can either choose a study material from the drop-down menu or create a new one by clicking Add study material (the button is displayed to the users who have the right to manage materials).
- Creating a new study material is similar to how you add a study material in the Materials menu item (instructions)
- If you have finished creating the material, save the changes by clicking Publish/Update and close the view by clicking X. The system will automatically attach the created material with the training
- NB! It’s not mandatory to add a study material to the online training (to allow you to create a course before adding the study materials to the system). Still, please keep in mind that an online training that has no study material cannot be marked as complete in the Employee Portal. This, in turn, makes the entire course impossible to pass (if the online training is mandatory). That’s why it’s important to add the study material before publishing the occurrence
- You can either choose a study material from the drop-down menu or create a new one by clicking Add study material (the button is displayed to the users who have the right to manage materials).
- (Optional) enter the training’s duration
- (Optional) click Save training to save the changes
- The difference between the Save training and Save course buttons: the Save training button is for when you wish to save the changes before the course is finalized (e.g., before having added all the trainings). The Save course button is the final save and the last step of creating the course
Classroom trainings
Classroom trainings are the kind of trainings that take place at a physical location (the training’s time and place are defined in the occurrence’s Schedule view).
Information about how a classroom training is displayed in the Employee Portal can be found here.
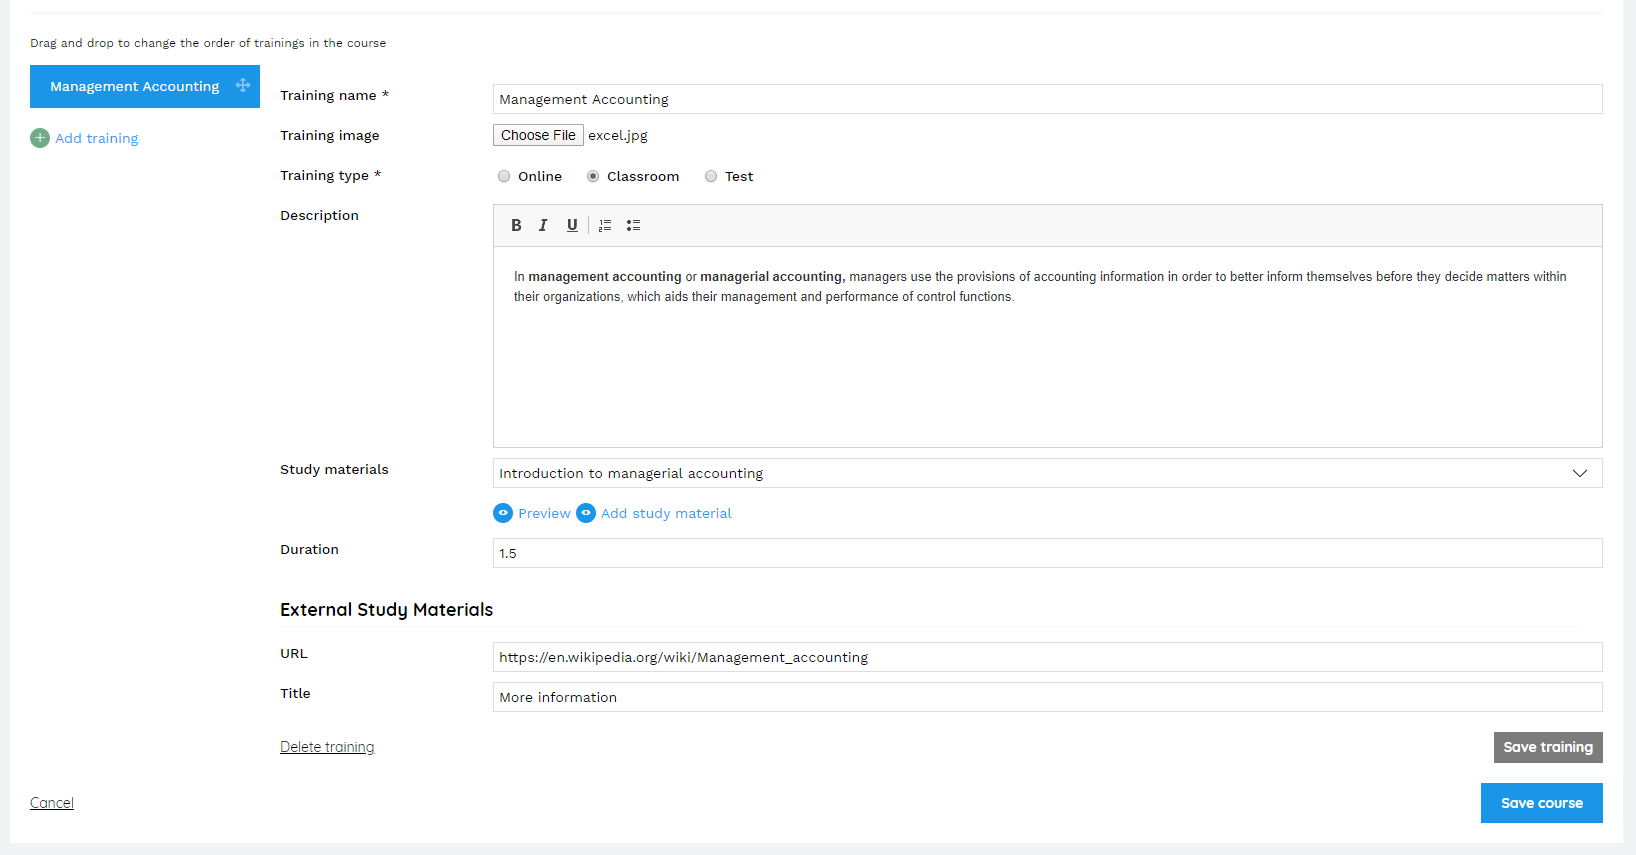
Adding a classroom training
- Enter the training’s name
- (Optional) add a picture to the training
- Choose Classroom as the training type
- (Optional) write the training’s description
- (Optional) attach a study material to the training
- You can either choose a study material from the drop-down menu or create a new one by clicking Add study material (the button is displayed to the users who have the right to manage materials).
- Creating a new study material is similar to how you add a study material in the Materials menu item (instructions)
- If you have finished creating the material, save the changes by clicking Publish/Update and close the view by clicking X. The system will automatically attach the created material with the training
- The study materials of classroom trainings are not mandatory for the employees to complete in the Employee Portal (unlike the study materials of online trainings)
- You can either choose a study material from the drop-down menu or create a new one by clicking Add study material (the button is displayed to the users who have the right to manage materials).
- (Optional) enter the training’s duration
- (Optional) you can add a link for external study materials. The link will be displayed in the Employee Portal as a button. The Title field is for defining the name of the button
- (Optional) click Save training to save the changes
- The difference between the Save training and Save course buttons: the Save training button is for when you wish to save the changes before the course is finalized (e.g., before having added all the trainings). The Save course button is the final save and the last step of creating the course
Tests
Test type trainings allow you to conduct various tests (such as exams or mock tests) that the testee can take in the Employee Portal. Use the Forms menu item to create a form with the necessary questions and settings for the test (or use an existing form). A test type training can have either a specific form or a selection of forms from which the system chooses a random form for the testee to fill out.
Using randomized form assignment is useful when the employee needs to take the same training more than once (for example after the course certificate expires or the employee has failed to pass the course). If the employee has completed a course and needs to take it again (within a different occurrence), then the system assigns them a form that they didn’t fill out previously (form assignment is still randomized but the previously filled form won’t be selected). To use this option, check the Randomized form assignment for testees check-box.
It’s also possible to add a feedback form to the test type training (enables the testee to give feedback after completing the test). The forms for feedback can be created in the Forms menu item the same way as the test forms are created.
Information about how a test type training is displayed in the Employee Portal can be found here.
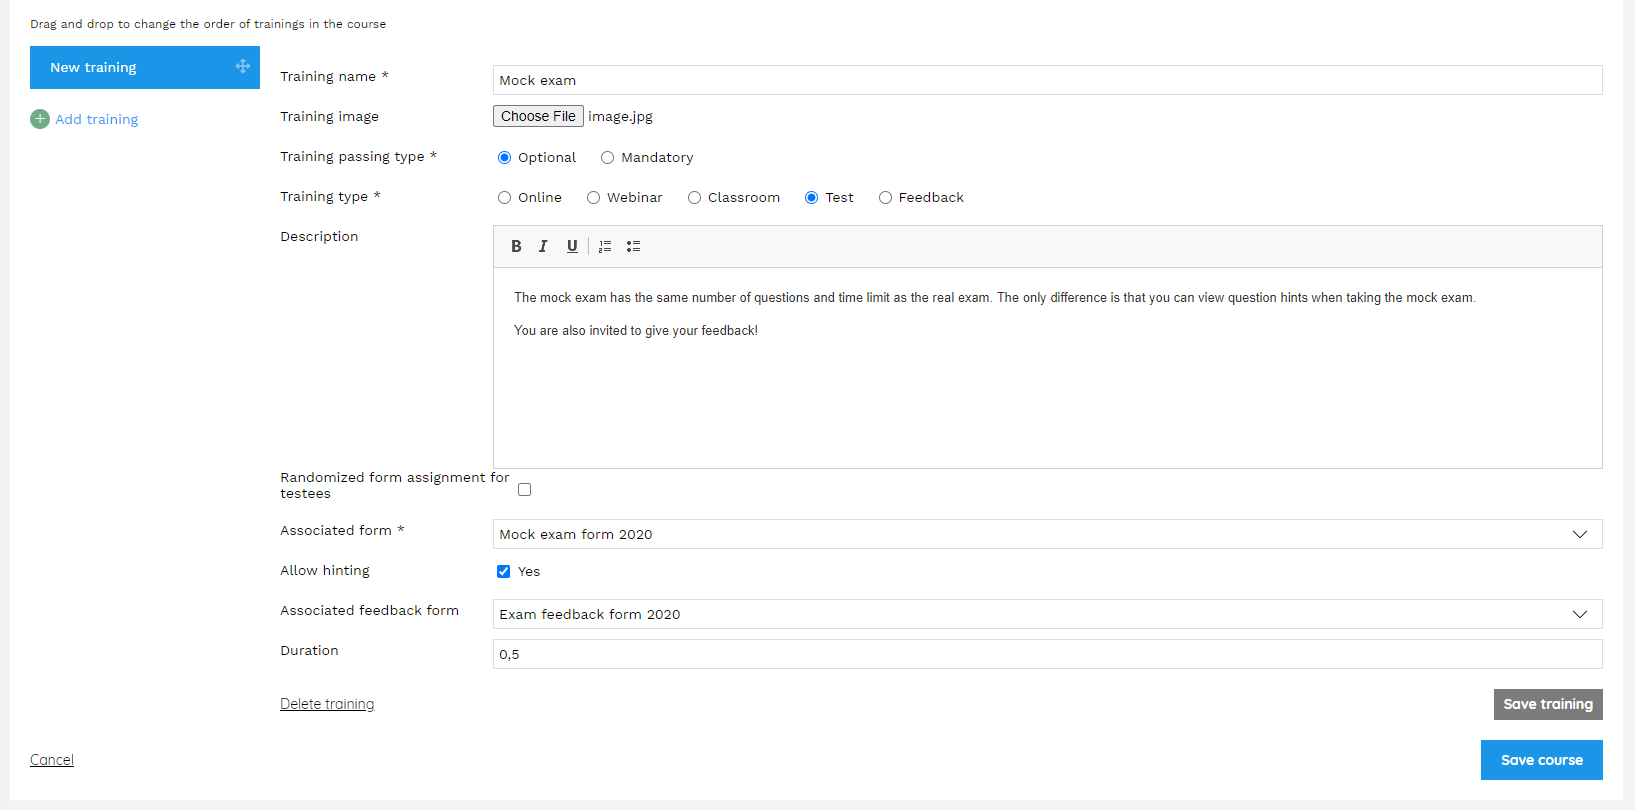
Adding a test type training
- Enter the training’s name
- (Optional) add a picture to the training
- Choose whether the training is mandatory or optional
- Choose Test as the training type
- (Optional) write the training’s description
- (Optional) check the Randomized form assignment for testees checkbox if you wish to use a selection of forms from which the system chooses a random form for the testee to fill out
- Add a form or forms to the training
- Choose whether the question hints will be displayed or not
- (Optional) add a feedback form to the training. The option to submit the feedback will be displayed on the test results page
- (Optional) enter the training’s duration
- (Optional) click Save training to save the changes
- The difference between the Save training and Save course buttons: the Save training button is for when you wish to save the changes before the course is finalized (e.g., before having added all the trainings). The Save course button is the final save and the last step of creating the course
Webinars
You can use webinar type trainings to add general information about the webinar and the link to the webinar’s platform. The system will also send webinar-specific reminders that include iCalendar invites.
You can attach study materials to the webinar type trainings.
Information about how a webinar type training is displayed in the Employee Portal can be found here.
Adding a webinar type training
- Enter the webinar’s name
- (Optional) add a picture
- Choose whether the training is mandatory or optional
- Choose Webinar as the training type
- (Optional) write the webinar’s description
- (Optional) attach a study material to the training
- You can either choose a study material from the drop-down menu or create a new one by clicking Add study material (the button is displayed to the users who have the right to manage materials).
- Creating a new study material is similar to how you add a study material in the Materials menu item (instructions)
- If you have finished creating the material, save the changes by clicking Publish/Update and close the view by clicking X. The system will automatically attach the created material with the training
- The study materials of webinars are not mandatory for the employees to complete in the Employee Portal (unlike the study materials of online trainings)
- You can either choose a study material from the drop-down menu or create a new one by clicking Add study material (the button is displayed to the users who have the right to manage materials).
- (Optional) enter the webinar’s duration
- (Optional) click Save training to save the changes
- The difference between the Save training and Save course buttons: the Save training button is for when you wish to save the changes before the course is finalized (e.g., before having added all the trainings). The Save course button is the final save and the last step of creating the course
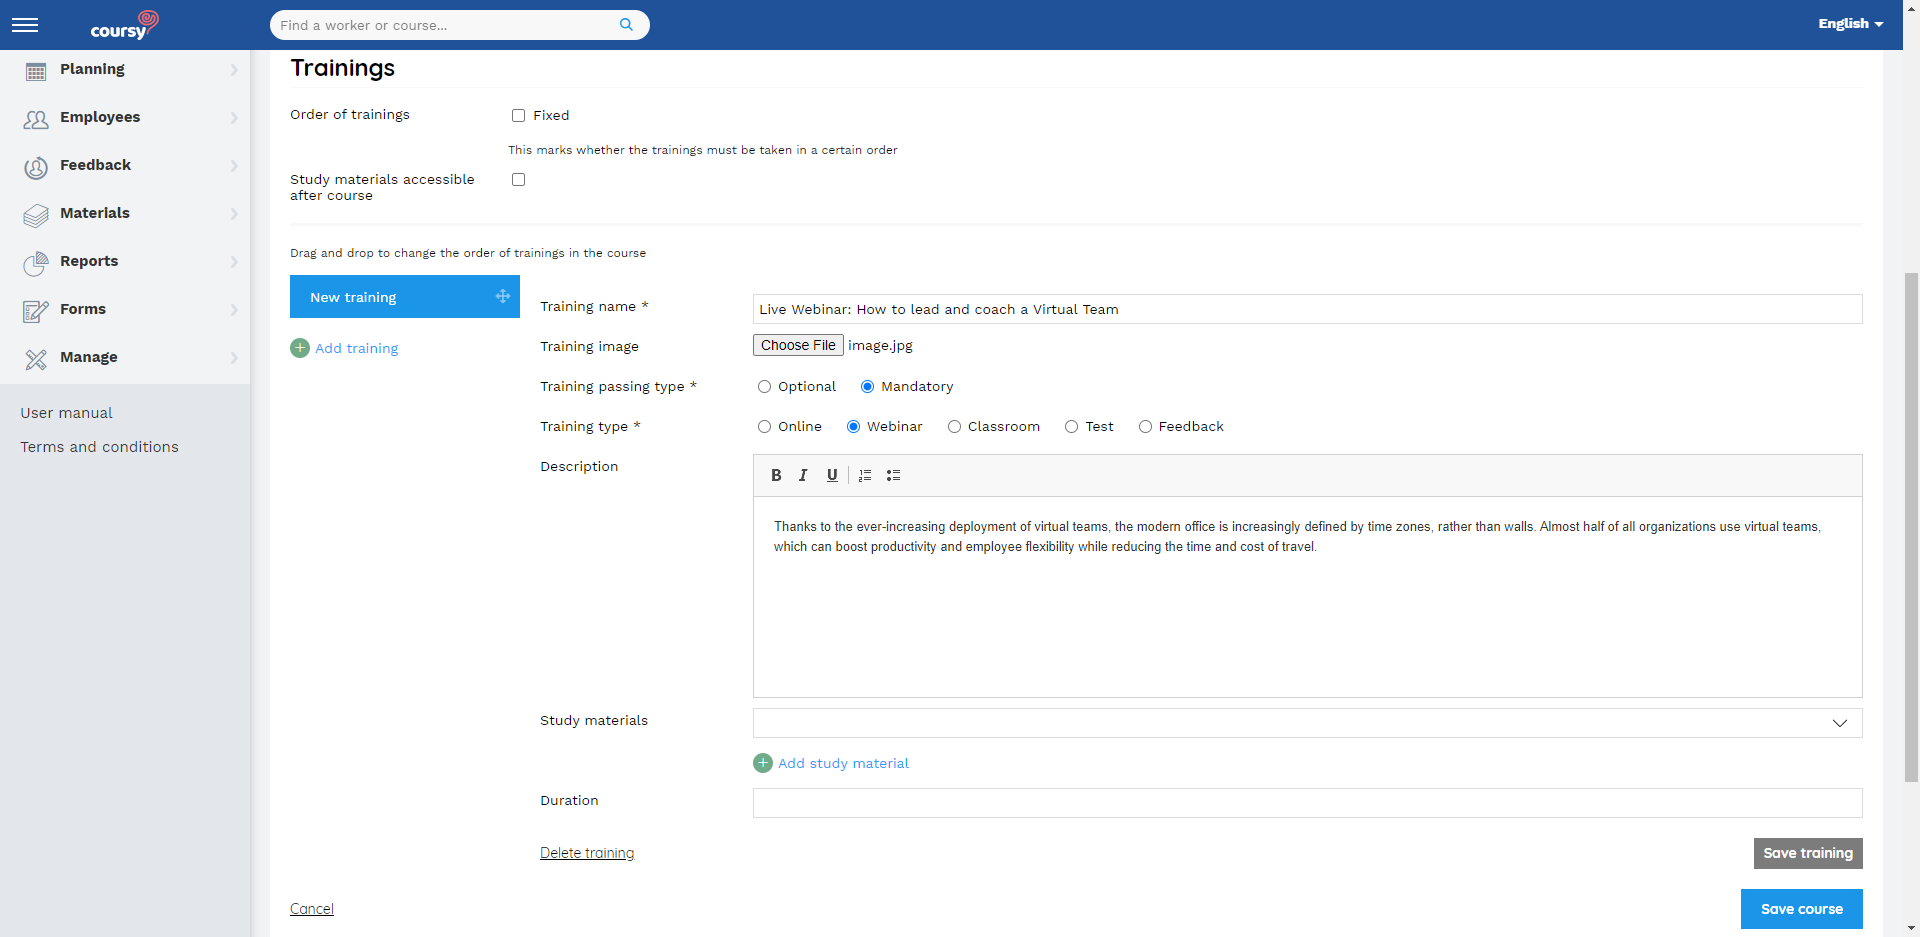
The order of taking trainings
The Order of trainings field allows you to determine whether the employees need to take the trainings in a fixed or freely chosen order. If the order of trainings is fixed, then the employee can access the training only after the previous mandatory training has been successfully finished. If the training passing type is optional, then it doesn’t need to be passed before starting the next training.
The order of trainings is free by default. If there is at least one published occurrence connected to the version, then the Order of trainings field is uneditable.
You can change the sequence of trainings by drag&drop after you have added them to the version.
Course access
The Access field determines who can view or edit the course in Coursy TMS. If the course is accessible for a specific site, then the TMS user needs to have the necessary privileges in that site.
The course is displayed in the Courses menu item for the users who have a privilege that allows them to view or manage courses in the corresponding site. To see the course in the Planning menu item, the user also needs to have the “Manage planning” or “View planning” privilege.
If the user has the Company manage privilege, then they can view and edit all the company’s courses (the Access limitation is not applied).
Defining course access
When a user adds a new course, then the Access field only displays the sites where they have the necessary privilege for adding courses. The privileges that give the right to add new courses are “Manage courses” and “Administrate courses”.
All the company’s sites are displayed for users with the Company manage privilege. Additionally, the Company manager can set the course’s access as All sites.
The “All sites” choice
The All sites choice for the course’s Access field has two possible configurations:
- All can manage – if the course’s access is All sites, then all the users who have the necessary privilege to manage courses, have the right to manage that course.
- Only Company manager can manage – if the course’s access is All sites or more than one site, then only Company managers can edit the course’s general data, targets, and versions.
The All can manage setting is activated by default. If you wish to change the configuration, please contact Coursy support or contact person.
Who can edit the course access?
If one specific site has been defined in the course’s Access field, then the field is editable for all the users who have a privilege for managing courses in the corresponding site.
If more than one site or the All sites choice has been defined in the Access field, then the field is editable only for the users who have the Company manage privilege.
